Tuesday, October 30, 2018

Garden Summary 2018 - Part 1: Getting Started

This year I finally got to create a garden outside! After keeping plants in pots in all my windowsills through school, it was wonderful to let them grow to their potential under the sun's full light. Not having to worry about watering them every week was nice too.

I decided to start small with one raised garden bed. That way it would stay manageable, and I could always expand in the future. With help from my boyfriend and his dad, I built and placed a 4-ft by 8-ft bed that extended a little over a foot up from the ground. We bought a few bags of garden soil to get things started.


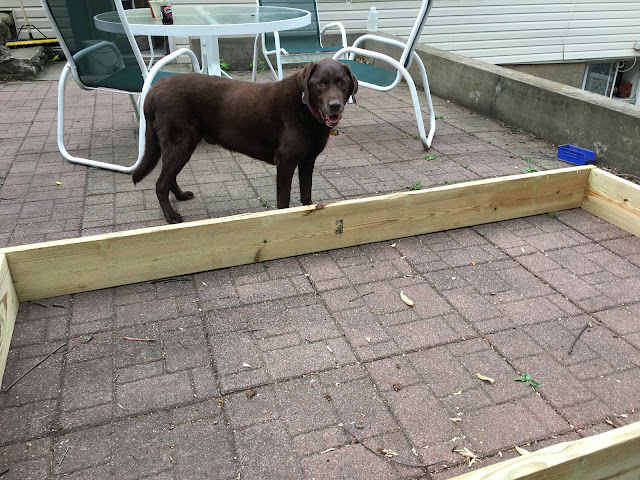
Here's Coco, performing his supervisor duties as I screw the boards together for the garden frame. 

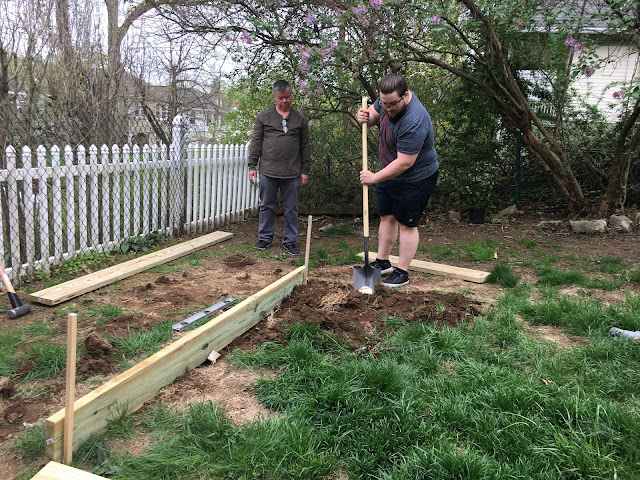
The ground is a little uneven, so Ed digs along the edges of where the bed will be placed. 


"Really? Right here? You know this is my prime pooping spot." 

Instead of starting things from seed like I usually do with my other experiments, I decided to buy some starter plants this year. It was better for the timing, and I didn't have the time or space (or planning capabilities) to grow my own seedlings this year. After a shopping spree at Home Depot with a gift card from my parents - last year's Christmas gift - we came home with 10 various nightshades, as well as a few random herbs and strawberries.

Nightshades staged in their future homes. Starting in the front and moving clockwise: two Roma tomatoes, jalapeno, serrano, red bell pepper, purple bell pepper, green bell pepper, purple Cherokee heirloom tomato, Thai chili, and another jalapeno. 

After a few weeks of growth, it was clear that the Romas were going to need some extra support - they grow fast! I found a few old tomato cages under the porch to help them along their way. Everything got established well, we didn't lose any plants. 

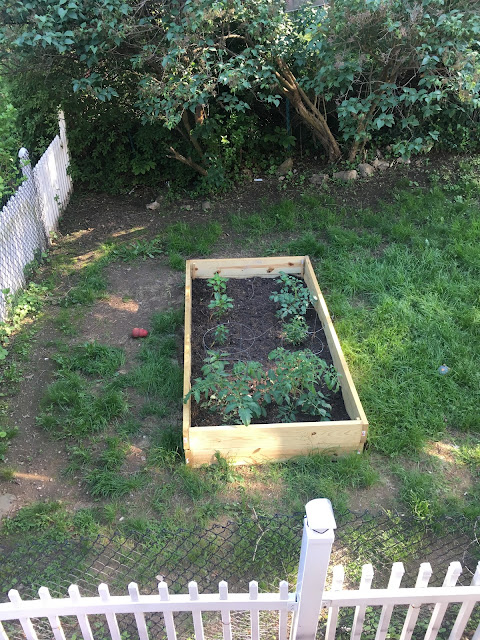
A view of the garden from above. You can see just how big the tomatoes are compared to the other plants. 

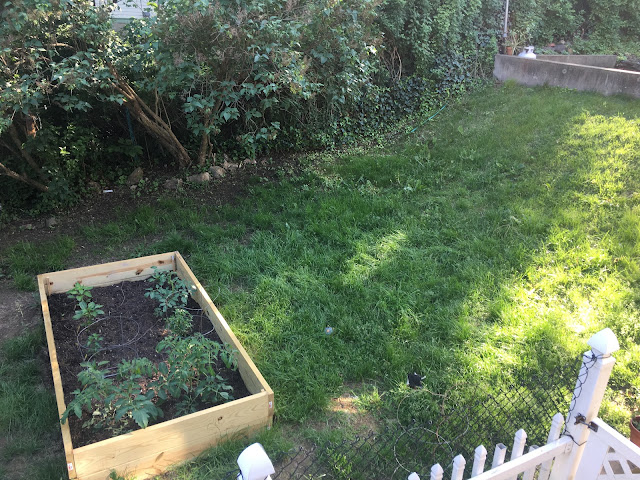
Another view to include some more of the yard. Look to the top right: Behind the concrete wall is where I planted my herbs and strawberries. 
 It wasn't a long wait before everything started flowering, and where there are flowers there is soon fruit! I mostly just took pictures of the tomatoes, which I'm still trying to understand, because I don't even really like tomatoes that much. At least not raw. I think part of the excitement is that of growing something new and learning in the process. There are also many different things to make with tomatoes that I do like, such as spaghetti sauce and ketchup. I picked a sauce variety for this reason.

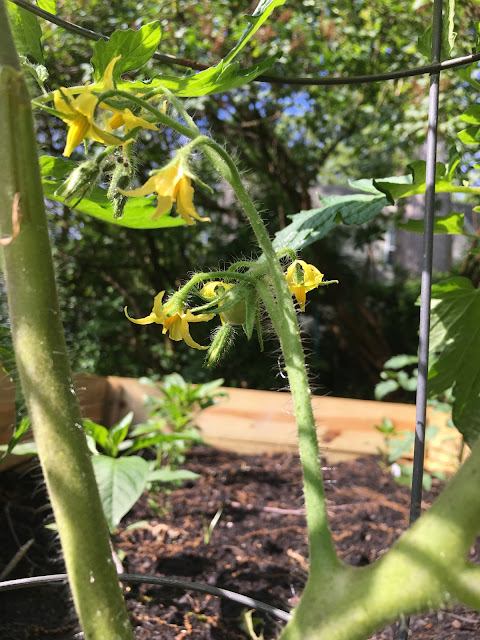
The first blooms on my Roma tomato plant. 

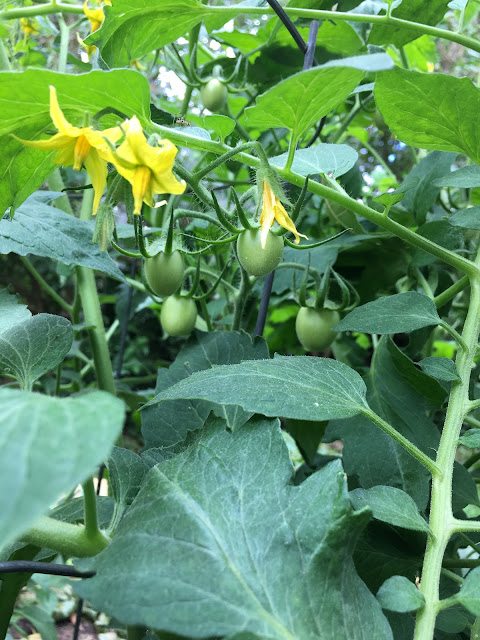
Roma tomato setting fruit!

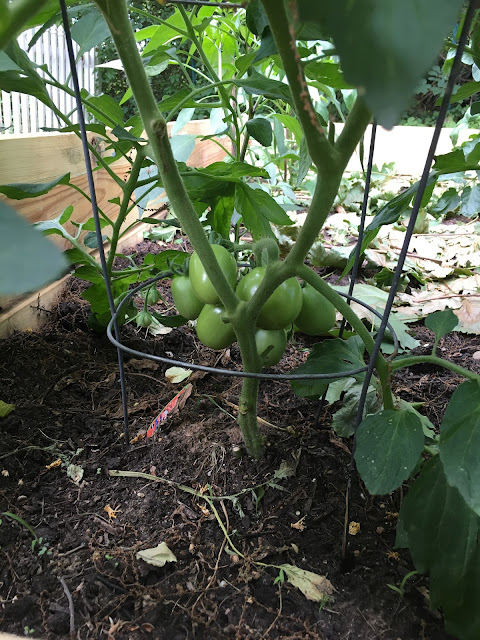
Check out these big boys! 
Sadly, I only ever got to harvest a few tomatoes, despite having two large, productive plants. The problem? The dog kept eating them before I got a chance to harvest! The day after I took that last photo above, those beautiful tomatoes were gone. That's how it was all summer: every time anything got close to ripening, Coco would sneak into the garden and gobble it up.

As I learned through a little bit of research, green tomatoes are not good for dogs. The chemical solanine is present in the green parts of nightshades; this is the reason why green potatoes are inedible. This compound is no longer present once the tomatoes ripen, but until then they're not a good thing to feed the pup. I did what I could with my available resources to keep him out, but it was nothing against the determined, constant hunger of a Lab.

Next year I'm putting up a fence.


Until next time,

Jess

Friday, March 31, 2017

Bubbling Maples

So I was walking home from school today, passing through the park, and I looked over at a tree, and I noticed that there were bubbles on it. It has been raining here all day, so I figured it had something to do with that.


Plus, it wasn't just in one spot. Looking at the next photo, notice the patches of white bubbles above the hollow as well as down by the ground. What could be causing this? I think it might be something to do with it being a maple tree?


It's not just the one tree, either. I kept walking through the park and came across another tree I know to be a maple, and it was bubbling at the bark as well.


Anyone know what this may be caused from? I'm going to search for answers online now!

In the meantime, have a video!
(I apologize for the terrible video quality!!)


Until next time, 

Jess


Growing Red Onions From Scraps


I picked up some red onions that had sprouted from the kitchen at my internship because I would rather grow them than see them sit there and rot and eventually get thrown away. It is my namesake, after all! 

Here I am holding one of them in my kitchen. It's skinny right now because I peeled off all the fleshy layers and ate them! This is actually a few days since I snatched it up, so its roots have been growing like crazy. I've had it sitting in a cup with some damp paper towels.

The paper towel in a cup thing is what I did to transport it from my internship, through a busy day of classes, and back home. I would have put it in plain water if there wasn't a risk of me spilling it all over. Plus I imagine having a substrate help keep things aerated down there. 

What do I plan to do with this onion? 

Well, it turns out that if I plant it, I can grow a whole new onion! All I have to do is split the sets apart like in the next photo, pop them in some dirt, and follow the same water and sunlight regimen as if I had bought sets from the garden store! 


Because I don't have a lot of space, I may or may not grow them myself. I'll probably end up planting them at the garden I intern for. They have Egyptian walking onions there, but I don't think they have any reds. And they are all about biodiversity! 

That's all I've got to show with the onions for now! If you have and questions or comments feel free to comment below. 

Until next time, 

Jess

Tuesday, March 7, 2017

Air Plants

Just photos today, folks! 


Pretty in pink!

Sisters chillin next to each other

Mama with her pups

Sprouting Pitaya Seeds (Dragon Fruit)

Today I discovered that my dragon fruit seeds I collected last fall started germinating! I actually tried sprouting them a couple times when I got them, but I didn't do it right (they kept drying out) so I set them aside for a few months and decided a couple weeks ago to try again.

Baby pitaya getting cozy in their new home!


So what did I do differently this time around? I used an empty salad container as a mini-greenhouse! My boyfriend and I have been trying to eat more salads, which means buying more lettuce, but we're not ambitious enough to buy a head of romaine and cut it ourselves, so we buy the pre-washed stuff. Typically I'd feel bad about being wasteful, but since I'm using three of these containers to sprout seeds at the moment, I don't feel quite so bad.

Unfortunately, I didn't take any photos of these little babies until after they sprouted, but I do have some of my starfruit (carambola) seeds I'm waiting on:

Carambola seeds in a mini-greenhouse for germination. 


For the starfruit I just used damp paper towels as a bed, spaced the seeds evenly, and put another layer of paper on top. Then I closed up the container, put it in the basement (it's out of the way but I also visit frequently to do laundry), and waited. Like I said, I'm still waiting on the starfruit, but the other day when I went to do laundry this is what I saw: 

Baby pitaya poking through a paper towel! 

I was so excited they finally sprouted! 

You may notice the paper towel for my dragon fruit is a lot darker than the one for star fruit. That's because there's actually some soil underneath. In my previous attempt to germinate the seeds, I mixed them in with potting soil. I didn't feel like trying to separate them from the dirt since that would take forever. I probably could have foregone the paper towel altogether since in the end it made repotting the babies a little difficult. But whatever, you live and you learn. 

I ended up using a pair of tweezers to transfer the seedlings into a proper pot, then put some cling wrap over top to keep it nice and humid. I can't wait to see how they do as time goes on! 


Until next time, 

Jess

Thursday, February 16, 2017

Strawberry Plants!


A couple years ago I grew two strawberry plants from seed. Unfortunately, I neglected them (because school), but here are the photos I took while they were still alive. 


I'm too lazy to write a full post on these since it's been so long, but if you have any questions feel free to shoot me a comment. 

Until next time, 

Jess

I Ate a Carambola Today!

Hello all! Long time no see!

A couple years ago I tried growing a seed from a starfruit that I ate. It sprouted and grew a couple true leaves (which I did not expect to be compound), but then after a few weeks it dried up and died. I couldn't figure out what I did wrong! Recently I was on YouTube and some guy from NZ was showing off his carambola seedlings, which he kept under plastic cups to keep the humidity up. I then understood what I did wrong!

This week I bought a couple carambola from the grocery store (mostly so I could try growing one again!), and ate one today, and got a few seeds from it. I'm not sure how viable they are, since some of them seemed a little flat. Once I was done eating, I collected them all from my plate and put them in a dish of water. This has a dual purpose: Firstly to clean all the gooey gunk off the seeds. Also, I had to go to class and didn't have time to pot them up, and I didn't want them to dry out.

This weekend I think I'll spend a little time putting them in dirt and figuring out some kind of miniature greenhouse for them. You know, so they don't die this time.

Edit: I ate an orange and got a seed! It was a navel orange, so I was surprised there were any seeds in the first place, but that's not the first time I've come across them from this variety. I actually got one to sprout earlier this year, but it only produced one leaf and I think it's slowly dying. So I put the orange seed in the water dish with all the carambola seeds.

Monday, January 25, 2016

Planting Cold-Stratified Seeds


So I finally decided to plant some of the seeds I've been stratifying in the fridge. Since I posted last, I also collected quite a few Gala apple seeds.

Back in the fall, I planted some pits that were sprouting roots. Unfortunately, I did not keep them moist enough, and they all died. One plum seedling got to almost three inches tall until it gave up on life. I was quite sad. But knowing I still had more seeds was a good consolation.

Realizing my mistake, I decided this time to plant them in some jars instead of an egg carton or terra cotta. And to put some plastic on top.

I had three nice big jars on hand, so I planted one each of three different kinds of seeds: one peach, one plum (prune), and one apple (gala).

So as of now, I'm out of plum seeds, so I really hope this one does well, especially since it came from a tree grown in zone 5, Any of the peach seeds I have were store-bought, so there's no guarantee they'll sprout well, or if they do, that they'll fare well in the cold NY winters. As for apples, I have a ton of Gala seeds with little root tails ready to get cozy in some soil. They should be ok for now in the fridge. I just really want to plant them all now. The more I plant, the higher the chances are that I will end up with a viable tree that produces delicious apples.

I'll post an update in a few weeks to report on any progress. As for now, wish these little guys luck!


Until next time,

~ Jess ~

Saturday, September 26, 2015

Pomegranate Growth After First Pruning

Nearly three weeks ago, I pruned my pomegranate sapling from 12 inches down to 6 inches. Over the next few days, six buds began to swell, five low on the trunk, soon to become branches, and one at the top to take over as the main trunk (called the leader). 

Notice the two buds swelling just above where the bottom two leaves connect to the trunk. 

There are another two buds sprouting from the same spot, seen here on the left side of the stem. 

A small bud beginning to grow halfway up the main stem. 

This bud will take over as the main trunk, called the leader. 
After a week, the buds had tripled in size! I was surprised that there were so many buds lower down on the trunk, as opposed to how avocados grow more buds higher up closer to the pruning cut. 

The buds have tripled in size!


I stopped taking so many pictures because I got busy with work and school, but I got a chance to take some this afternoon. Look at how grown up it looks now! 


So now here's a shot of just the bottom portion. I can really start to imagine how it's going to look as it continues to fill out. 

New baby branches! 


Like I've said before, I plan to try to keep this little tree as compact as possible while I'm still in college and not settled down yet. I'm thinking, pruning-wise, every 12 inches in height, I'll cut her back six. Then for the branches, every 6 inches they grow, I'll trim back three. I may revise this as she continues to grow, depending on what works and what looks best. For now things are going well!

I'll post again about her when it's time for her next "haircut."

Until next time, 

- Jess

Thursday, September 3, 2015

Planting Red Bell Pepper Seeds

As you can see, one of my favorite things is to collect seeds from food I'm eating and see if they will grow. Some time last week, I made stuffed peppers, an absolutely delicious meal. At home my mom uses green bell peppers, but I prefer more color, so I bought four red bell peppers. Yellow and orange are really good too.

Once the food was in the oven, I pulled a chair up to the table where I was working and started collecting the seeds from the four bell pepper tops.

I put them in a small tupperware bowl and set that in the window so that the seeds could dry before putting them in storage. Every so often, like once or twice a day, I would pick up the bowl and swirl it around so the seeds would dry evenly.

Once I assumed they were all dry, I poured all the seeds into an old pill bottle. I saw this on Pinterest, and it has worked out well so far. I labeled the bottle with what seeds were inside and when I harvested them.


That's a lot of seeds! I'm not sure if I'm ever going to use them all, but they sure are pretty to look at.


Once I had that established, I put some potting soil in a cup and put 5 or 6 seeds in the middle. Usually I would only use 2 or 3 seeds max, but you can never be too sure how well seeds from store-bought foods are going to germinate, especially if they are not organic. There are so many hybrid varieties out there in the grocery stores that you never really know what you're going to get. I don't expect to get a perfect red bell pepper from this experiment, but I'll be happy if I get something close.

Here's my cup of dirt with seeds inside:


Fast forward to last night: I decided to check on my cup of dirt and I saw two little sprouts pushing their way up through the soil!

I took a picture this morning:


The two bigger ones are what I saw last night, and since then a new baby with its seed still stuck on its head has popped up as well. 

I've noticed that when growing peppers from seeds collected from the fruit, some of the babies just don't ever escape from the seed hull. I suppose that's just all a part of natural/artificial selection. I'm assuming it has something to do with growing hybrids. 

Once these babies get bigger, I'll thin them down to just one plant, which I hope to be able to keep in this small pot/cup/thingy. I'll probably end up having to prune it to keep it small, which will delay fruit production unfortunately. But if I'm going to keep it small, it's going to need nice thick stems in order to hold up those big bell pepper pods! I'd really rather not have to stake the plant up or put it in a tomato cage. 

Of course, here I go counting my peppers before they flower... 

It's fun to imagine the possibilities, but for now I must remain patient. I will continue to post as things change. 

Until next time,

- Jess