Showing posts with label Container gardening. Show all posts

Tuesday, March 7, 2017

Sprouting Pitaya Seeds (Dragon Fruit)

Today I discovered that my dragon fruit seeds I collected last fall started germinating! I actually tried sprouting them a couple times when I got them, but I didn't do it right (they kept drying out) so I set them aside for a few months and decided a couple weeks ago to try again.

Baby pitaya getting cozy in their new home!


So what did I do differently this time around? I used an empty salad container as a mini-greenhouse! My boyfriend and I have been trying to eat more salads, which means buying more lettuce, but we're not ambitious enough to buy a head of romaine and cut it ourselves, so we buy the pre-washed stuff. Typically I'd feel bad about being wasteful, but since I'm using three of these containers to sprout seeds at the moment, I don't feel quite so bad.

Unfortunately, I didn't take any photos of these little babies until after they sprouted, but I do have some of my starfruit (carambola) seeds I'm waiting on:

Carambola seeds in a mini-greenhouse for germination. 


For the starfruit I just used damp paper towels as a bed, spaced the seeds evenly, and put another layer of paper on top. Then I closed up the container, put it in the basement (it's out of the way but I also visit frequently to do laundry), and waited. Like I said, I'm still waiting on the starfruit, but the other day when I went to do laundry this is what I saw: 

Baby pitaya poking through a paper towel! 

I was so excited they finally sprouted! 

You may notice the paper towel for my dragon fruit is a lot darker than the one for star fruit. That's because there's actually some soil underneath. In my previous attempt to germinate the seeds, I mixed them in with potting soil. I didn't feel like trying to separate them from the dirt since that would take forever. I probably could have foregone the paper towel altogether since in the end it made repotting the babies a little difficult. But whatever, you live and you learn. 

I ended up using a pair of tweezers to transfer the seedlings into a proper pot, then put some cling wrap over top to keep it nice and humid. I can't wait to see how they do as time goes on! 


Until next time, 

Jess

Thursday, February 16, 2017

Strawberry Plants!


A couple years ago I grew two strawberry plants from seed. Unfortunately, I neglected them (because school), but here are the photos I took while they were still alive. 


I'm too lazy to write a full post on these since it's been so long, but if you have any questions feel free to shoot me a comment. 

Until next time, 

Jess

I Ate a Carambola Today!

Hello all! Long time no see!

A couple years ago I tried growing a seed from a starfruit that I ate. It sprouted and grew a couple true leaves (which I did not expect to be compound), but then after a few weeks it dried up and died. I couldn't figure out what I did wrong! Recently I was on YouTube and some guy from NZ was showing off his carambola seedlings, which he kept under plastic cups to keep the humidity up. I then understood what I did wrong!

This week I bought a couple carambola from the grocery store (mostly so I could try growing one again!), and ate one today, and got a few seeds from it. I'm not sure how viable they are, since some of them seemed a little flat. Once I was done eating, I collected them all from my plate and put them in a dish of water. This has a dual purpose: Firstly to clean all the gooey gunk off the seeds. Also, I had to go to class and didn't have time to pot them up, and I didn't want them to dry out.

This weekend I think I'll spend a little time putting them in dirt and figuring out some kind of miniature greenhouse for them. You know, so they don't die this time.

Edit: I ate an orange and got a seed! It was a navel orange, so I was surprised there were any seeds in the first place, but that's not the first time I've come across them from this variety. I actually got one to sprout earlier this year, but it only produced one leaf and I think it's slowly dying. So I put the orange seed in the water dish with all the carambola seeds.

Monday, January 25, 2016

Planting Cold-Stratified Seeds


So I finally decided to plant some of the seeds I've been stratifying in the fridge. Since I posted last, I also collected quite a few Gala apple seeds.

Back in the fall, I planted some pits that were sprouting roots. Unfortunately, I did not keep them moist enough, and they all died. One plum seedling got to almost three inches tall until it gave up on life. I was quite sad. But knowing I still had more seeds was a good consolation.

Realizing my mistake, I decided this time to plant them in some jars instead of an egg carton or terra cotta. And to put some plastic on top.

I had three nice big jars on hand, so I planted one each of three different kinds of seeds: one peach, one plum (prune), and one apple (gala).

So as of now, I'm out of plum seeds, so I really hope this one does well, especially since it came from a tree grown in zone 5, Any of the peach seeds I have were store-bought, so there's no guarantee they'll sprout well, or if they do, that they'll fare well in the cold NY winters. As for apples, I have a ton of Gala seeds with little root tails ready to get cozy in some soil. They should be ok for now in the fridge. I just really want to plant them all now. The more I plant, the higher the chances are that I will end up with a viable tree that produces delicious apples.

I'll post an update in a few weeks to report on any progress. As for now, wish these little guys luck!


Until next time,

~ Jess ~

Saturday, September 26, 2015

Pomegranate Growth After First Pruning

Nearly three weeks ago, I pruned my pomegranate sapling from 12 inches down to 6 inches. Over the next few days, six buds began to swell, five low on the trunk, soon to become branches, and one at the top to take over as the main trunk (called the leader). 

Notice the two buds swelling just above where the bottom two leaves connect to the trunk. 

There are another two buds sprouting from the same spot, seen here on the left side of the stem. 

A small bud beginning to grow halfway up the main stem. 

This bud will take over as the main trunk, called the leader. 
After a week, the buds had tripled in size! I was surprised that there were so many buds lower down on the trunk, as opposed to how avocados grow more buds higher up closer to the pruning cut. 

The buds have tripled in size!


I stopped taking so many pictures because I got busy with work and school, but I got a chance to take some this afternoon. Look at how grown up it looks now! 


So now here's a shot of just the bottom portion. I can really start to imagine how it's going to look as it continues to fill out. 

New baby branches! 


Like I've said before, I plan to try to keep this little tree as compact as possible while I'm still in college and not settled down yet. I'm thinking, pruning-wise, every 12 inches in height, I'll cut her back six. Then for the branches, every 6 inches they grow, I'll trim back three. I may revise this as she continues to grow, depending on what works and what looks best. For now things are going well!

I'll post again about her when it's time for her next "haircut."

Until next time, 

- Jess

Thursday, September 3, 2015

Planting Red Bell Pepper Seeds

As you can see, one of my favorite things is to collect seeds from food I'm eating and see if they will grow. Some time last week, I made stuffed peppers, an absolutely delicious meal. At home my mom uses green bell peppers, but I prefer more color, so I bought four red bell peppers. Yellow and orange are really good too.

Once the food was in the oven, I pulled a chair up to the table where I was working and started collecting the seeds from the four bell pepper tops.

I put them in a small tupperware bowl and set that in the window so that the seeds could dry before putting them in storage. Every so often, like once or twice a day, I would pick up the bowl and swirl it around so the seeds would dry evenly.

Once I assumed they were all dry, I poured all the seeds into an old pill bottle. I saw this on Pinterest, and it has worked out well so far. I labeled the bottle with what seeds were inside and when I harvested them.


That's a lot of seeds! I'm not sure if I'm ever going to use them all, but they sure are pretty to look at.


Once I had that established, I put some potting soil in a cup and put 5 or 6 seeds in the middle. Usually I would only use 2 or 3 seeds max, but you can never be too sure how well seeds from store-bought foods are going to germinate, especially if they are not organic. There are so many hybrid varieties out there in the grocery stores that you never really know what you're going to get. I don't expect to get a perfect red bell pepper from this experiment, but I'll be happy if I get something close.

Here's my cup of dirt with seeds inside:


Fast forward to last night: I decided to check on my cup of dirt and I saw two little sprouts pushing their way up through the soil!

I took a picture this morning:


The two bigger ones are what I saw last night, and since then a new baby with its seed still stuck on its head has popped up as well. 

I've noticed that when growing peppers from seeds collected from the fruit, some of the babies just don't ever escape from the seed hull. I suppose that's just all a part of natural/artificial selection. I'm assuming it has something to do with growing hybrids. 

Once these babies get bigger, I'll thin them down to just one plant, which I hope to be able to keep in this small pot/cup/thingy. I'll probably end up having to prune it to keep it small, which will delay fruit production unfortunately. But if I'm going to keep it small, it's going to need nice thick stems in order to hold up those big bell pepper pods! I'd really rather not have to stake the plant up or put it in a tomato cage. 

Of course, here I go counting my peppers before they flower... 

It's fun to imagine the possibilities, but for now I must remain patient. I will continue to post as things change. 

Until next time,

- Jess


Monday, August 31, 2015

From Seed to Harvest: Chili Peppers (Jalapeno and Habanero)

Last summer I decided to start growing chili peppers. I love spicy foods (although my mouth doesn't always), and so does my boyfriend. To begin, I bought some seeds for jalapenos and habaneros. 

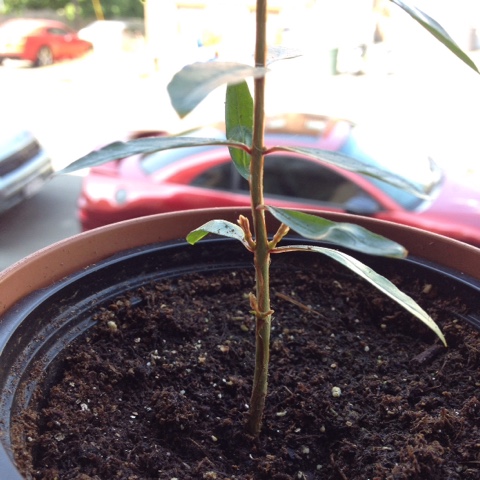
Here is a close-up of some of my first sprouts:


And again: 


I planted seeds in six pots: three pots of jalapeno and three of habanero. In each pot I planted three seeds, just in case some did not germinate. I think of the 18 seeds I used every single one sprouted! 


A few weeks later, the pepper plants were growing in full force! There were three plants in each pot, so I cut down the weaker plants so that there was only one growing in each pot. Artificial selection at its finest! 


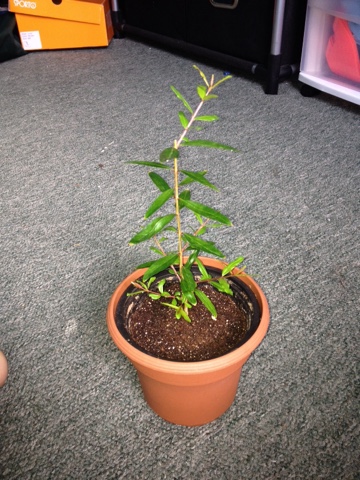
Here's a shot of my prettiest habanero sitting in the windowsill. Notice the heart shape of the leaves, as well as the regularity of leaf placement along the stem. 


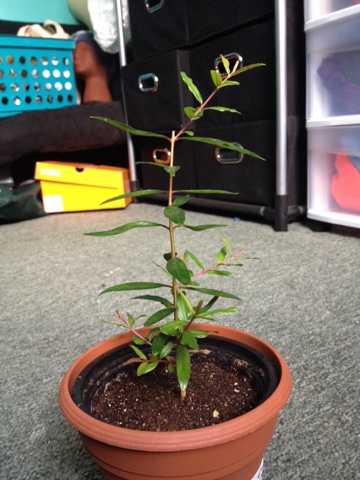
Here's another photo of it from above. 


The jalapenos ended up flowering before the habaneros. I'm not really sure why that is. I guess each variety just grows differently. So here's a photo of one of my jalapenos from above. You can see the different growth pattern, the different leaf shape, and the little round blobs that are its flower buds. 


I took a small hiatus from taking pictures when I was packing up and getting ready to leave for my third year of college. Once I got settled in, I had time again to take some pictures to document how my peppers were growing. I ended up taking four chili plants to school, two of each variety. The photo below shows my larger habanero on the left, and my larger jalapeno on the right. At this point my jalapenos were showing signs of flower buds, but none of them were opened up yet. The habaneros were still all leaf and no flower. 


And finally, a jalapeno flower! They are about 3/4 of an inch in diameter, and they droop down to face the ground. They have six white petals. 


Another shot of the jalapeno flowers: 


And another one (blurry because iPhones are not that great for photos):


To make sure I would get some peppers instead of just leaves and flowers, I used a q-tip to assist pollination. I had really good luck with the jalapenos pollinating! Below you can see the pods just starting to form. 


A shot of overall growth shape as the pepper pods start to form: 


Now we switch to looking at the habanero. It finally started to bloom, so I used the other side of my q-tip to try and pollinate its flowers. While most of the jalapeno flowers turned to pods, I only ever got two peppers from this habanero plant. It is now one year old and has been flowering nearly constantly since last fall. I don't know what I'm doing wrong. I got two pods growing last fall, which grew and ripened beautifully, but no luck since. Here's a shot of its foliage, with its little round flower buds interspersed throughout: 


While most of the flowers fell off my habanero without being pollinated, I finally got a pod growing! Seeing its size compared to my fingers makes it look that much cuter. :) 


As days turned to weeks, I continued to document the growth of my chilies as they grew. Below is a shot of my jalapeno showing off all its pods. All in all, nearly a dozen blossoms fertilized. A few pods dropped as they were ripening, but I suppose that is to be expected. 


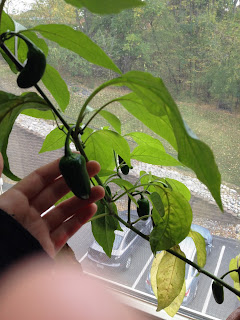
Compare the size of this jalapeno to my hand. Much bigger than that baby habanero pod earlier! 


Look how much bigger the habanero got since last time! It's still not ripe yet though, none of them are. Any time a pepper is green, it's most likely not ripe yet. Not that it can't be picked like that though. Most jalapenos we see are picked while still green, and then pickled. If all our green bell peppers were left on the plant, they would eventually ripen to red or yellow or orange, or even purple with some varieties. 

The habanero seed packet I bought had a variety of red, yellow, and orange varieties, so I was excited to see what color this guy would eventually ripen to. Below are two shots of the same pepper with some time elapsed, or perhaps it was just a different angle. I can't really remember, it was nearly a full year ago. 


Here are another couple shots of my jalapeno plant. On the left is my biggest one again (as seen above with my hand) after some more time has passed. On the right you can see how it and my hand compare roughly to the size of the whole plant, as well as the other peppers. Sorry about my blurry finger at the bottom! :P 


I was delighted to discover one day that one of my habanero pods had begun to ripen! I still couldn't tell if it was going to be red or orange, but it didn't really matter to me at that point anyway. 


The other habanero pod that was growing, smaller than the first, was also beginning to ripen. Looking at this one I could tell that it would eventually turn red. 


After probably a week since it first started changing color, the smaller one was completely ripe. It looked so pretty! 


In the meantime, I was getting impatient for my jalapenos to ripen all the way. I ended up picking the largest two while they were still green and using them in my quesadilla. 


After some time, probably a few weeks, the jalapenos were finally ripening to red. At this point the weather was beginning to get colder, and I suspect that's why the leaves were starting to look all old and gross. Even though the leaves were getting old, the pods looked young and vibrant! 


I decided that it was about time to harvest: 


In the meantime, I had harvested my smaller habanero and used that in sloppy joes. Or maybe it was tacos. As for the larger one, once it ripened fully, I picked it and hung it up to dry. I was worried it wouldn't dry well at first because for the first few weeks it just got really wrinkly. Eventually though it dried enough that my fingernail could no longer dent it. This little guy is gonna become crushed red pepper flakes for my boyfriend! 


Since harvest, my pepper plants have continued to live. No habaneros, but I did get some jalapenos in the spring. Unfortunately, the plants have been infested with thrips off and on since the fall, and the second harvest of jalapenos was no good. Still, the plants have been doing well enough. Eventually I want to prune them into a bonsai shape. For now though I left them at home for my mom to take care of while I'm off at school. Perhaps at some point I'll have my brother take some photos for me so I can post an update. 

Moving forward, I'm looking forward to buying a couple "Tin Can Garden" packages from work so I can grow chocolate habaneros and ghost peppers! I'll keep y'all updated as things change! 

Until next time, 

- Jess